This is the blog detailing how our team, KThxByte, managed to get 1st Runner-Up in the Technical Track of the National Artificial Intelligence Competition 2025.
Table of Contents
- Introduction and Task Description
- Collecting Data
- Data Preprocessing
- Data Augmentation
- Model Selection
- Training the Model
- Evaluation and Results
- Conclusion and Future Work
If you are looking for the link to the classifier, click here. The model currently is not hosted online, but you can download it from this repository and run it locally.
Introduction and Task Description
A summary of the task is to create a kuih classifier capable of identifying the predetermined 8 types of kuih outlined in the competition guidebook. We have a few weeks to collect the data and have to train a model (no specific restrictions) to classify the kuihs in a private test set. One of the most prominent judging criteria is the model performance. More info could be read in the competition guidebook.
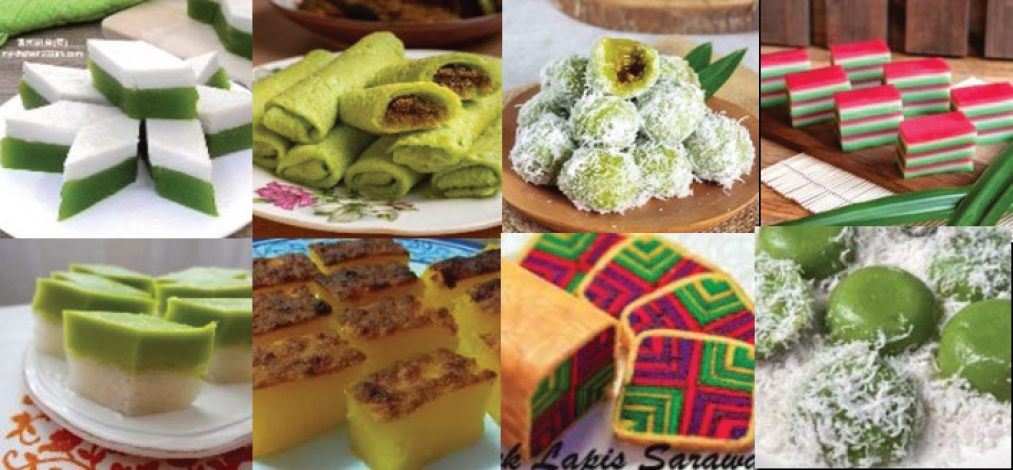
Kuihs are traditional Malaysian cakes, often colourful and made with various ingredients, perfect for a snack. The image below shows the 8 types of kuih we are tasked to classify.
Collecting Data
There is a saying in the machine learning (ML) community: Garbage in, Garbage out. This means that the quality of the data we feed the model affects the quality of the model. Our primary focus is to curate and collect a high-quality dataset that is devoid of noise and bias. Some of the sources we used were Google Images, cooking blogs and forums, publicly available datasets and most importantly, kuihs we bought.
In total, we are able to collect over 17,000 images with kuihs in various angles, backgrounds, positions, etc., to create a rich dataset.

Data Preprocessing
The next step is to preprocess the data. Without preprocessing, we will face a lot of issues, such as images with extremely high resolutions, different image colour channels, colour spaces, formats, etc. We had to learn this the hard way, as we initially thought we could just feed the images into the model. Without preprocessing, the images would also trigger CUDA out of memory errors, as some of our phone cameras take images with pixel counts larger than the limit of 89478485 pixels. A short snippet of code to convert the images to a standard format (512x512, RGB, PNG) is shown below:
 1try:
 2    img = Image.open(source_path)
 3
 4    # Convert Colour Space
 5    if img.mode == 'RGBA' or img.mode == 'P':
 6        img = img.convert("RGBA")
 7        background = Image.new("RGB", img.size, (255, 255, 255))
 8        background.paste(img, mask=img.split()[3]) # Paste with alpha channel to handle transparency
 9        img = background
10    elif img.mode != 'RGB':
11        img = img.convert("RGB")
12
13    # Resize using LANCZOS resampling (Very useful algorithm for downscaling)
14    resized_img = img.resize(target_size, Image.Resampling.LANCZOS)
15
16    new_filename = f"{file_counter}.{output_format.lower()}"
17    target_path = os.path.join(target_class_dir, new_filename)
18    resized_img.save(target_path, format=output_format)
19except Exception as e:
20    print(f"Error processing {source_path}: {e}")
Key Takeaway: Standardising and preprocessing makes your life a ton better
Data Augmentation
Augmentation is a crucial step if you want your model to generalise well. We chose a few techniques, including random flips and rotation, colour jittering and random erasing. This is done using the torchvision library, as it provides all the augmentation techniques we need. The code snippet and image below show how we implemented the augmentation:
 1transform_flip_rotate = transforms.Compose([
 2    transforms.RandomHorizontalFlip(p=0.5),
 3    transforms.RandomVerticalFlip(p=0.5),
 4    transforms.RandomRotation(degrees=45),
 5    transforms.ToTensor()
 6])
 7
 8transform_color_jitter = transforms.Compose([
 9    transforms.ColorJitter(brightness=0.2, contrast=0.2, saturation=0.2, hue=0.1),
10    transforms.ToTensor()
11])
12
13transform_random_erasing = transforms.Compose([
14    transforms.ToTensor(),
15    transforms.RandomErasing(p=0.5, scale=(0.02, 0.1), ratio=(0.3, 3.3), value='random')
16])

During the competition, we learnt that many people applied
Key Takeaway: don’t overdo it. Sometimes, less is more.
Model Selection
Next up is finally going into the machine learning part. We had a few requirements:
- The model should be lightweight and fast.
- The model should be “complex enough” to learn the features of the kuihs.
- The model should exceed our baseline accuracy (more on this later).
The easiest way to train a model to classify kuihs is through transfer learning. Training a model from scratch requires hyperparameter tuning, modifying the layers of the neural network to improve performance, etc., which is why we ultimately decided against it.
Before we even start deciding the model, we should train a baseline to assess the improvement of our model. We went with Teachable Machine by Google, which lets us set up and train in less than 10 minutes. With some runs, the best we manage to get is 57% testing accuracy, given ~100 images per kuih class.
Selecting a model is a simple task that is quite common in competitions like these. We repeat a simple process to determine the best model for our data and usage.
- Select a few images (~100 per class)
- Define the model (loss function doesn’t need to be redefined)
- Train the model (
epoch=20, lr=0.001) without fine-tuning (more on this later) - Evaluate the model (
accuracyis the simplest metric) - Repeat steps
2-4with different models
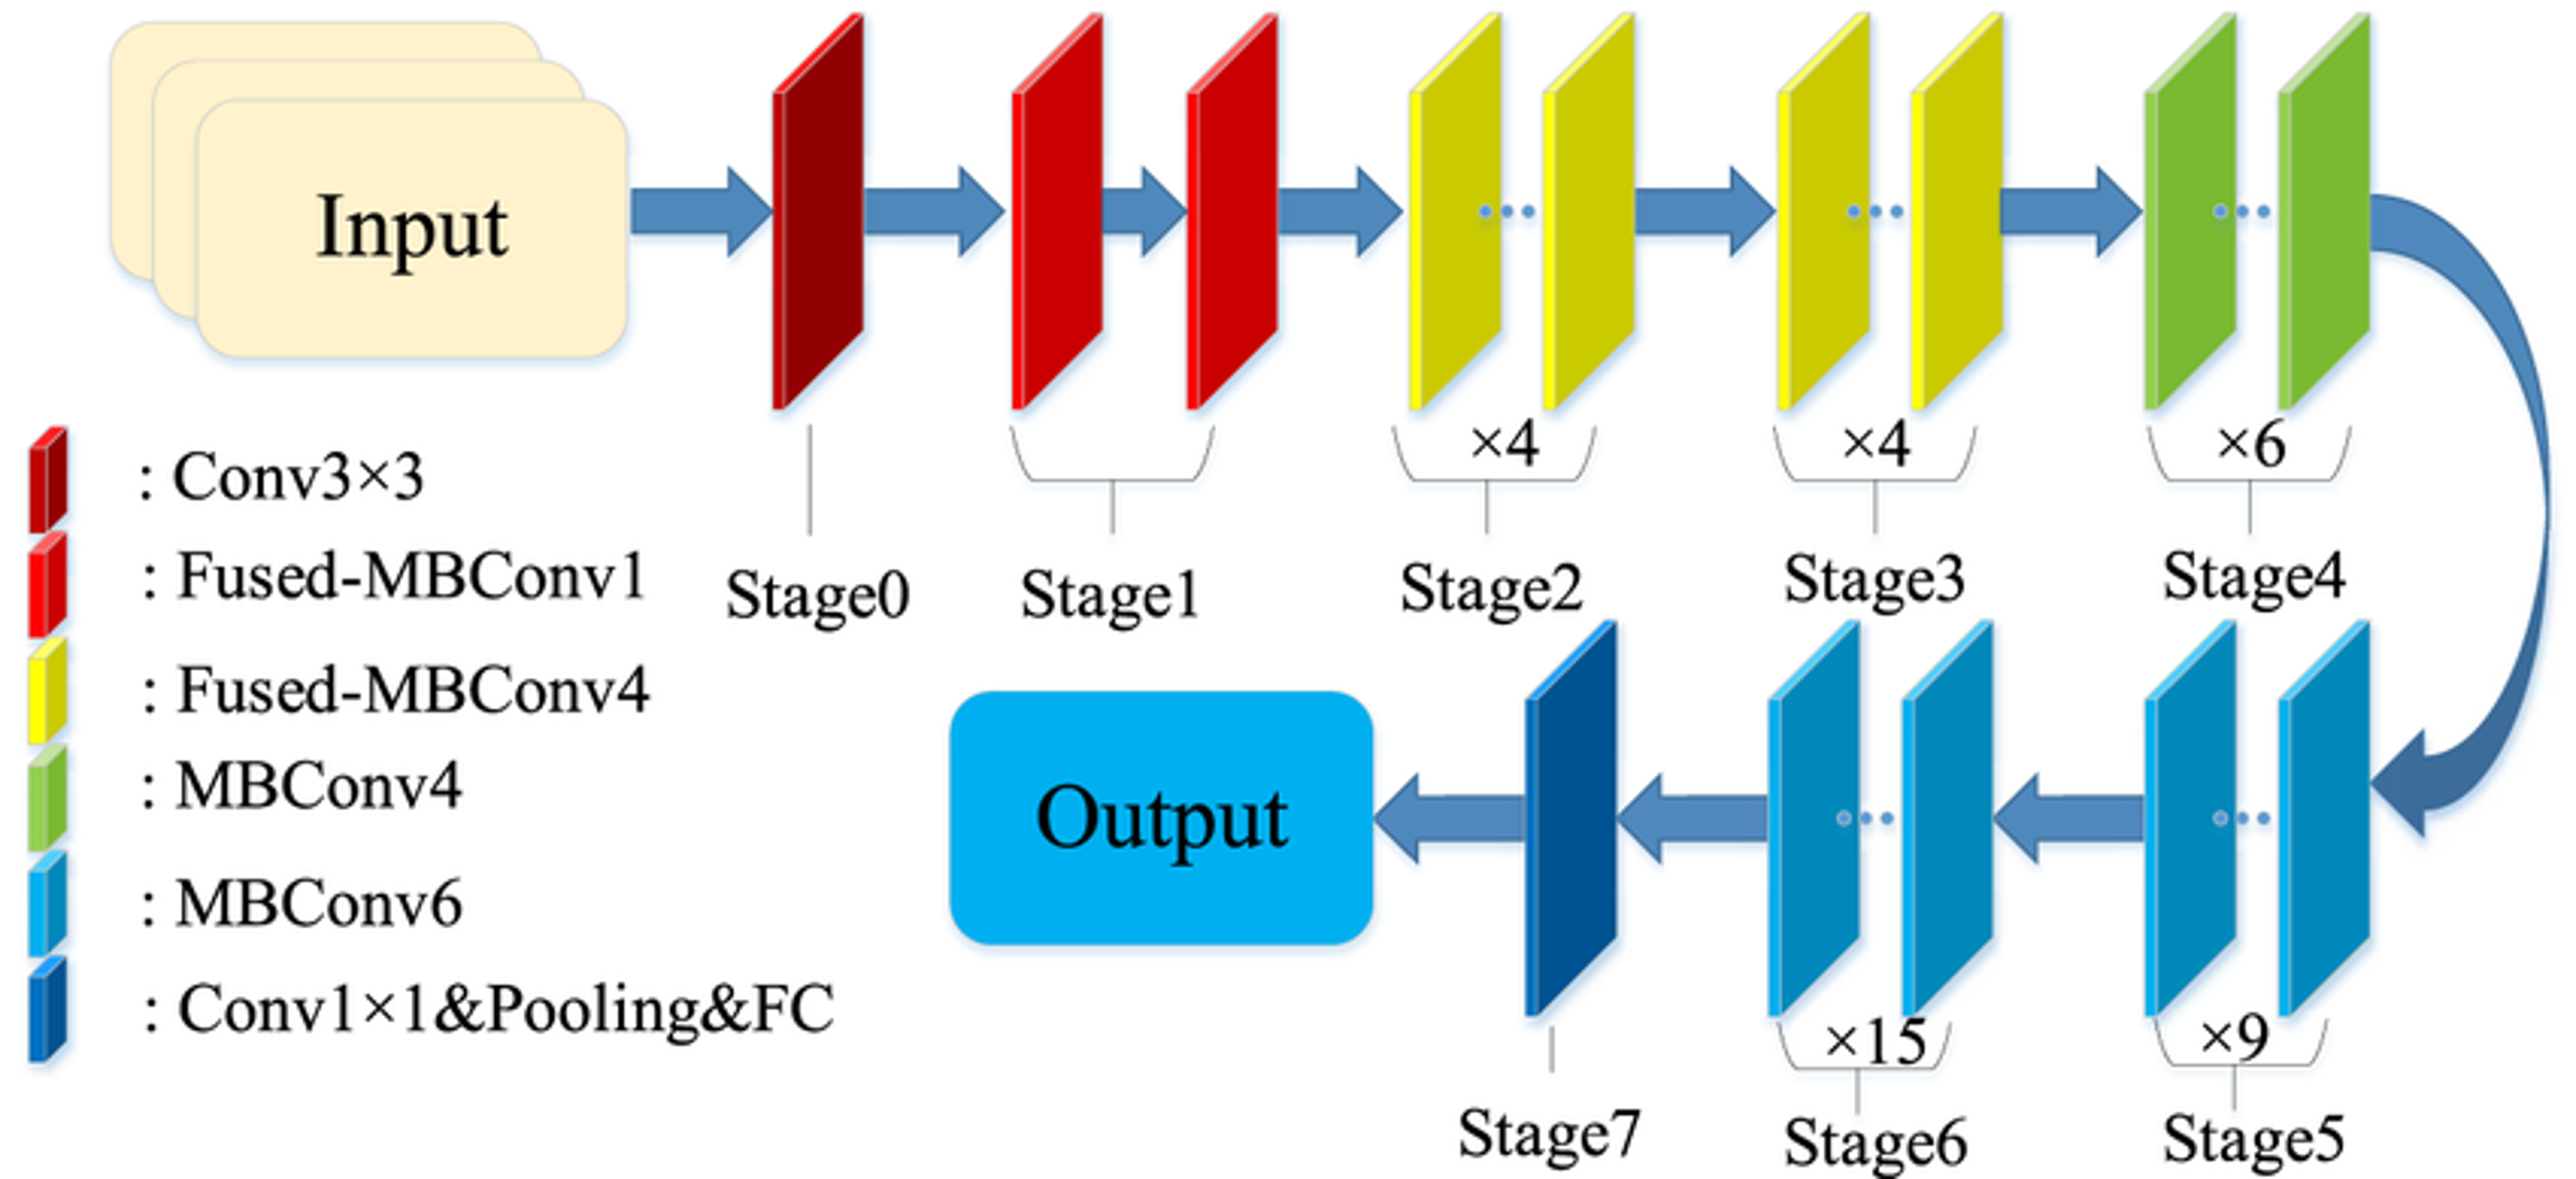
Some of the models we tried were ResNet34, RestNet50, EfficientNetV2 and Vision Transformers (ViT). Through this process, we were able to determine that EfficientNetV2 is the best at this task. Its model architecture is shown below.
Key takeaway: Try out different things before jumping into full-on training
Training the Model
With the model decision being EfficientNetV2, we start training. Such a large dataset required us to use a lot of GPU VRAM just to process the images. On my device with an NVIDIA Laptop 4050, it crashed just having a batch size of 8. We had to turn to Google Colab to train the model. We first define some of our hyperparameters as below:
1IMG_HEIGHT = 512
2IMG_WIDTH = 512
3BATCH_SIZE = 32 # Adjust based on GPU VRAM
4VAL_SPLIT_RATIO = 0.2 # Validation Split Ratio, 80% validation, 20% test
5LEARNING_RATE = 0.001
6EPOCHS = 30 # Max epochs; early stopping might trigger sooner
7SEED = 42 # For reproducibility
8TARGET_ACCURACY_FOR_EARLY_EXIT = 0.98 # Stop if val_accuracy hits 98%
Using datasets.ImageFolder, we don’t need to define our own custom DataLoader. Then, we define our model as below:
 1model = timm.create_model(
 2        PRETRAINED_MODEL_NAME,
 3        pretrained=True,
 4        num_classes=NUM_CLASSES, # This replaces the classifier head to 8 kuihs
 5        drop_rate=0.3, # Dropout rate for the classifier head
 6        drop_path_rate=0.2 # Stochastic depth drop path rate
 7    )
 8
 9criterion = nn.CrossEntropyLoss(weight=class_weights)
10optimizer = optim.AdamW([
11    {'params': model.get_classifier().parameters() if hasattr(model, 'get_classifier') else model.classifier.parameters()}
12], lr=LEARNING_RATE, weight_decay=0.01) # Better regularization
Class Imbalances
Due to the dataset being collected from various sources, we noticed there were some classes having fewer images than others. To fix this, we used the confusion matrix from the testing to determine the class weights. In the end, 2.5 weight was applied to 2 kuihs while the rest remain 1.0.
Transfer Learning
Since this model is trained through transfer learning, we first split the training into two phases: training the final output layer and fine-tuning deeper layers.
Training the output layer
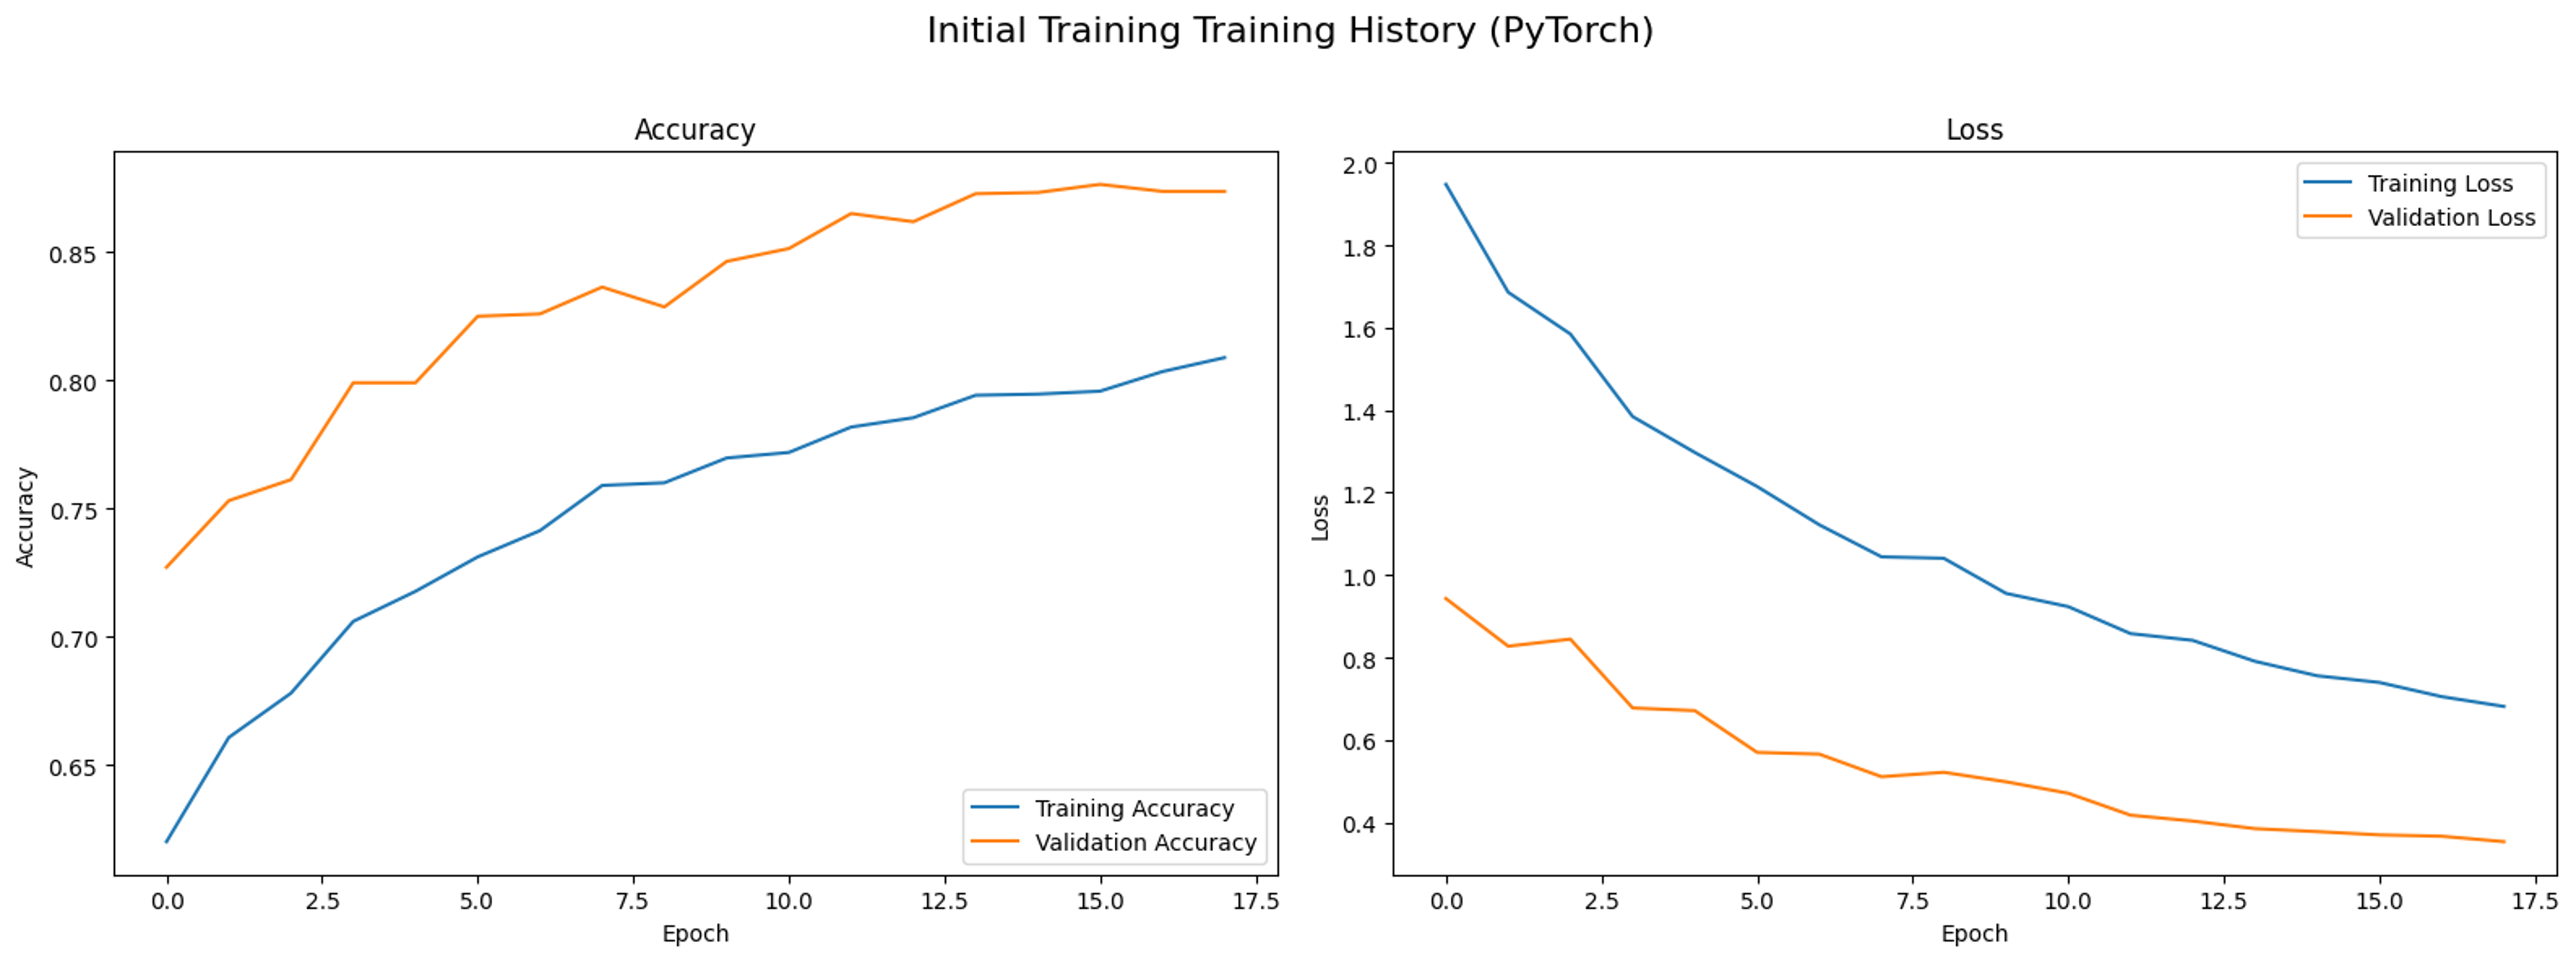
In this phase, we only train the final output layer. GradScaler is used to prevent overflowing the gradients, which is common in large model trainings. With 17 epochs, we noticed that the model stabilises at around 87% and we manually stopped the training.
Fine-tuning deeper layers
To achieve better performance, there are two main ways: the first is to tune the model’s hyperparameters, while the second is to fine-tune the deeper layers. We chose the latter as it is easier to implement and faster to train.
 1# Unfreezing block 4 onwards
 2for name, param in model.named_parameters():
 3    layers = ['blocks.4', 'blocks.5', 'blocks.6', 'conv_head', 'bn2', 'classifier']
 4    for layer in layers:
 5        if layer in name:
 6            param.requires_grad = True
 7        else:
 8            param.requires_grad = False
 9
10# Using a lower learning rate
11FINE_TUNE_LEARNING_RATE = LEARNING_RATE / 10
12optimizer_finetune = optim.AdamW(
13    filter(lambda p: p.requires_grad, model.parameters()), # Only pass trainable parameters
14    lr=FINE_TUNE_LEARNING_RATE,
15    weight_decay=0.01
16)
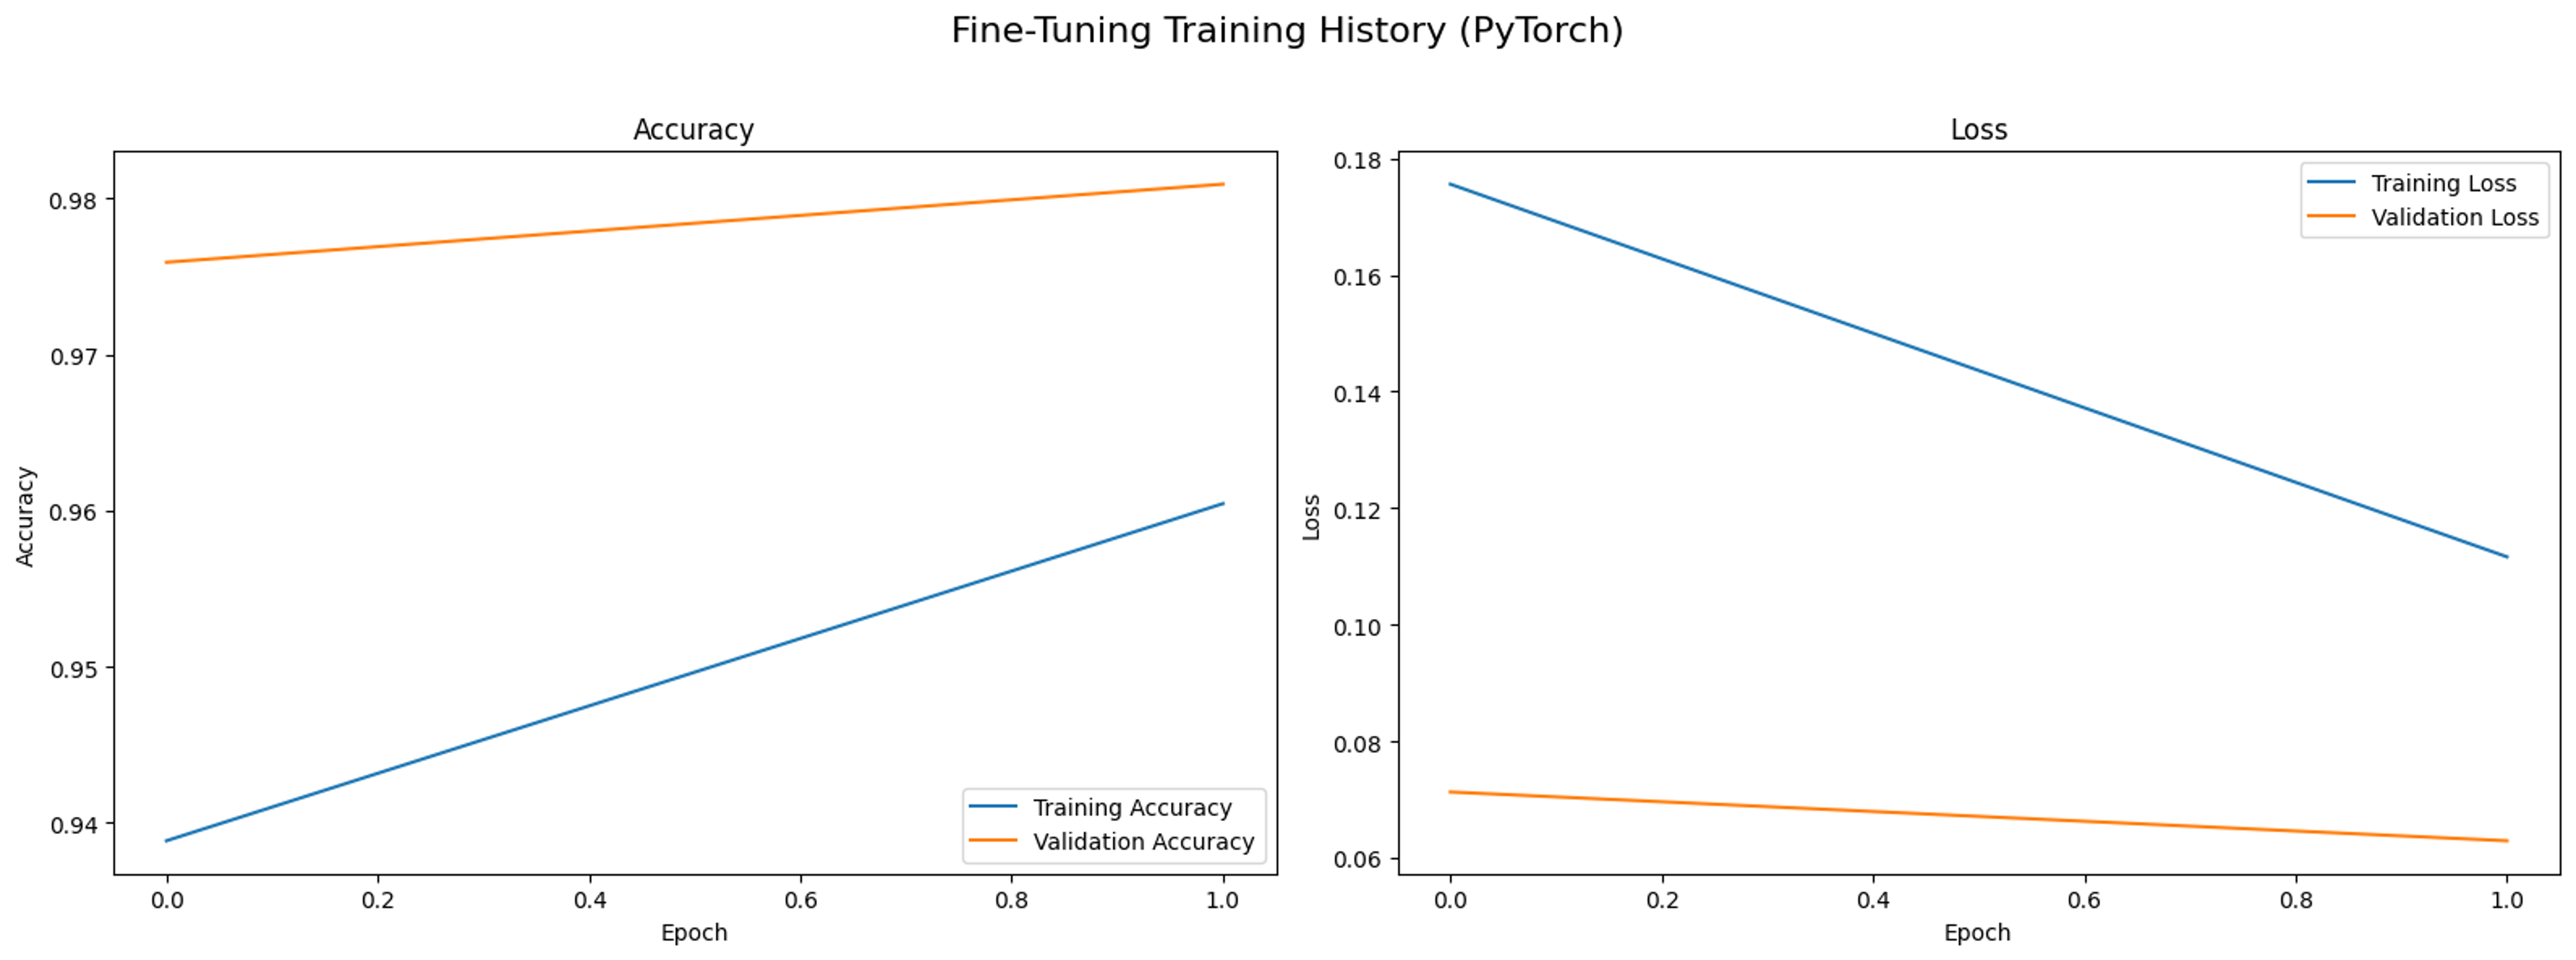
With just 2 epochs, we managed to achieve 98% validation accuracy.
Key takeaway: Fine-tuning deeper layers is a great and easy way to improve model performance.
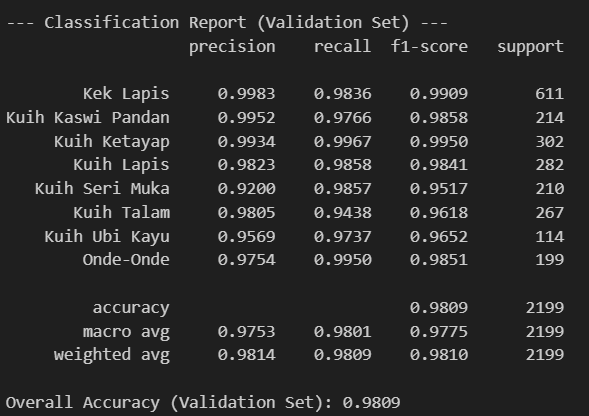
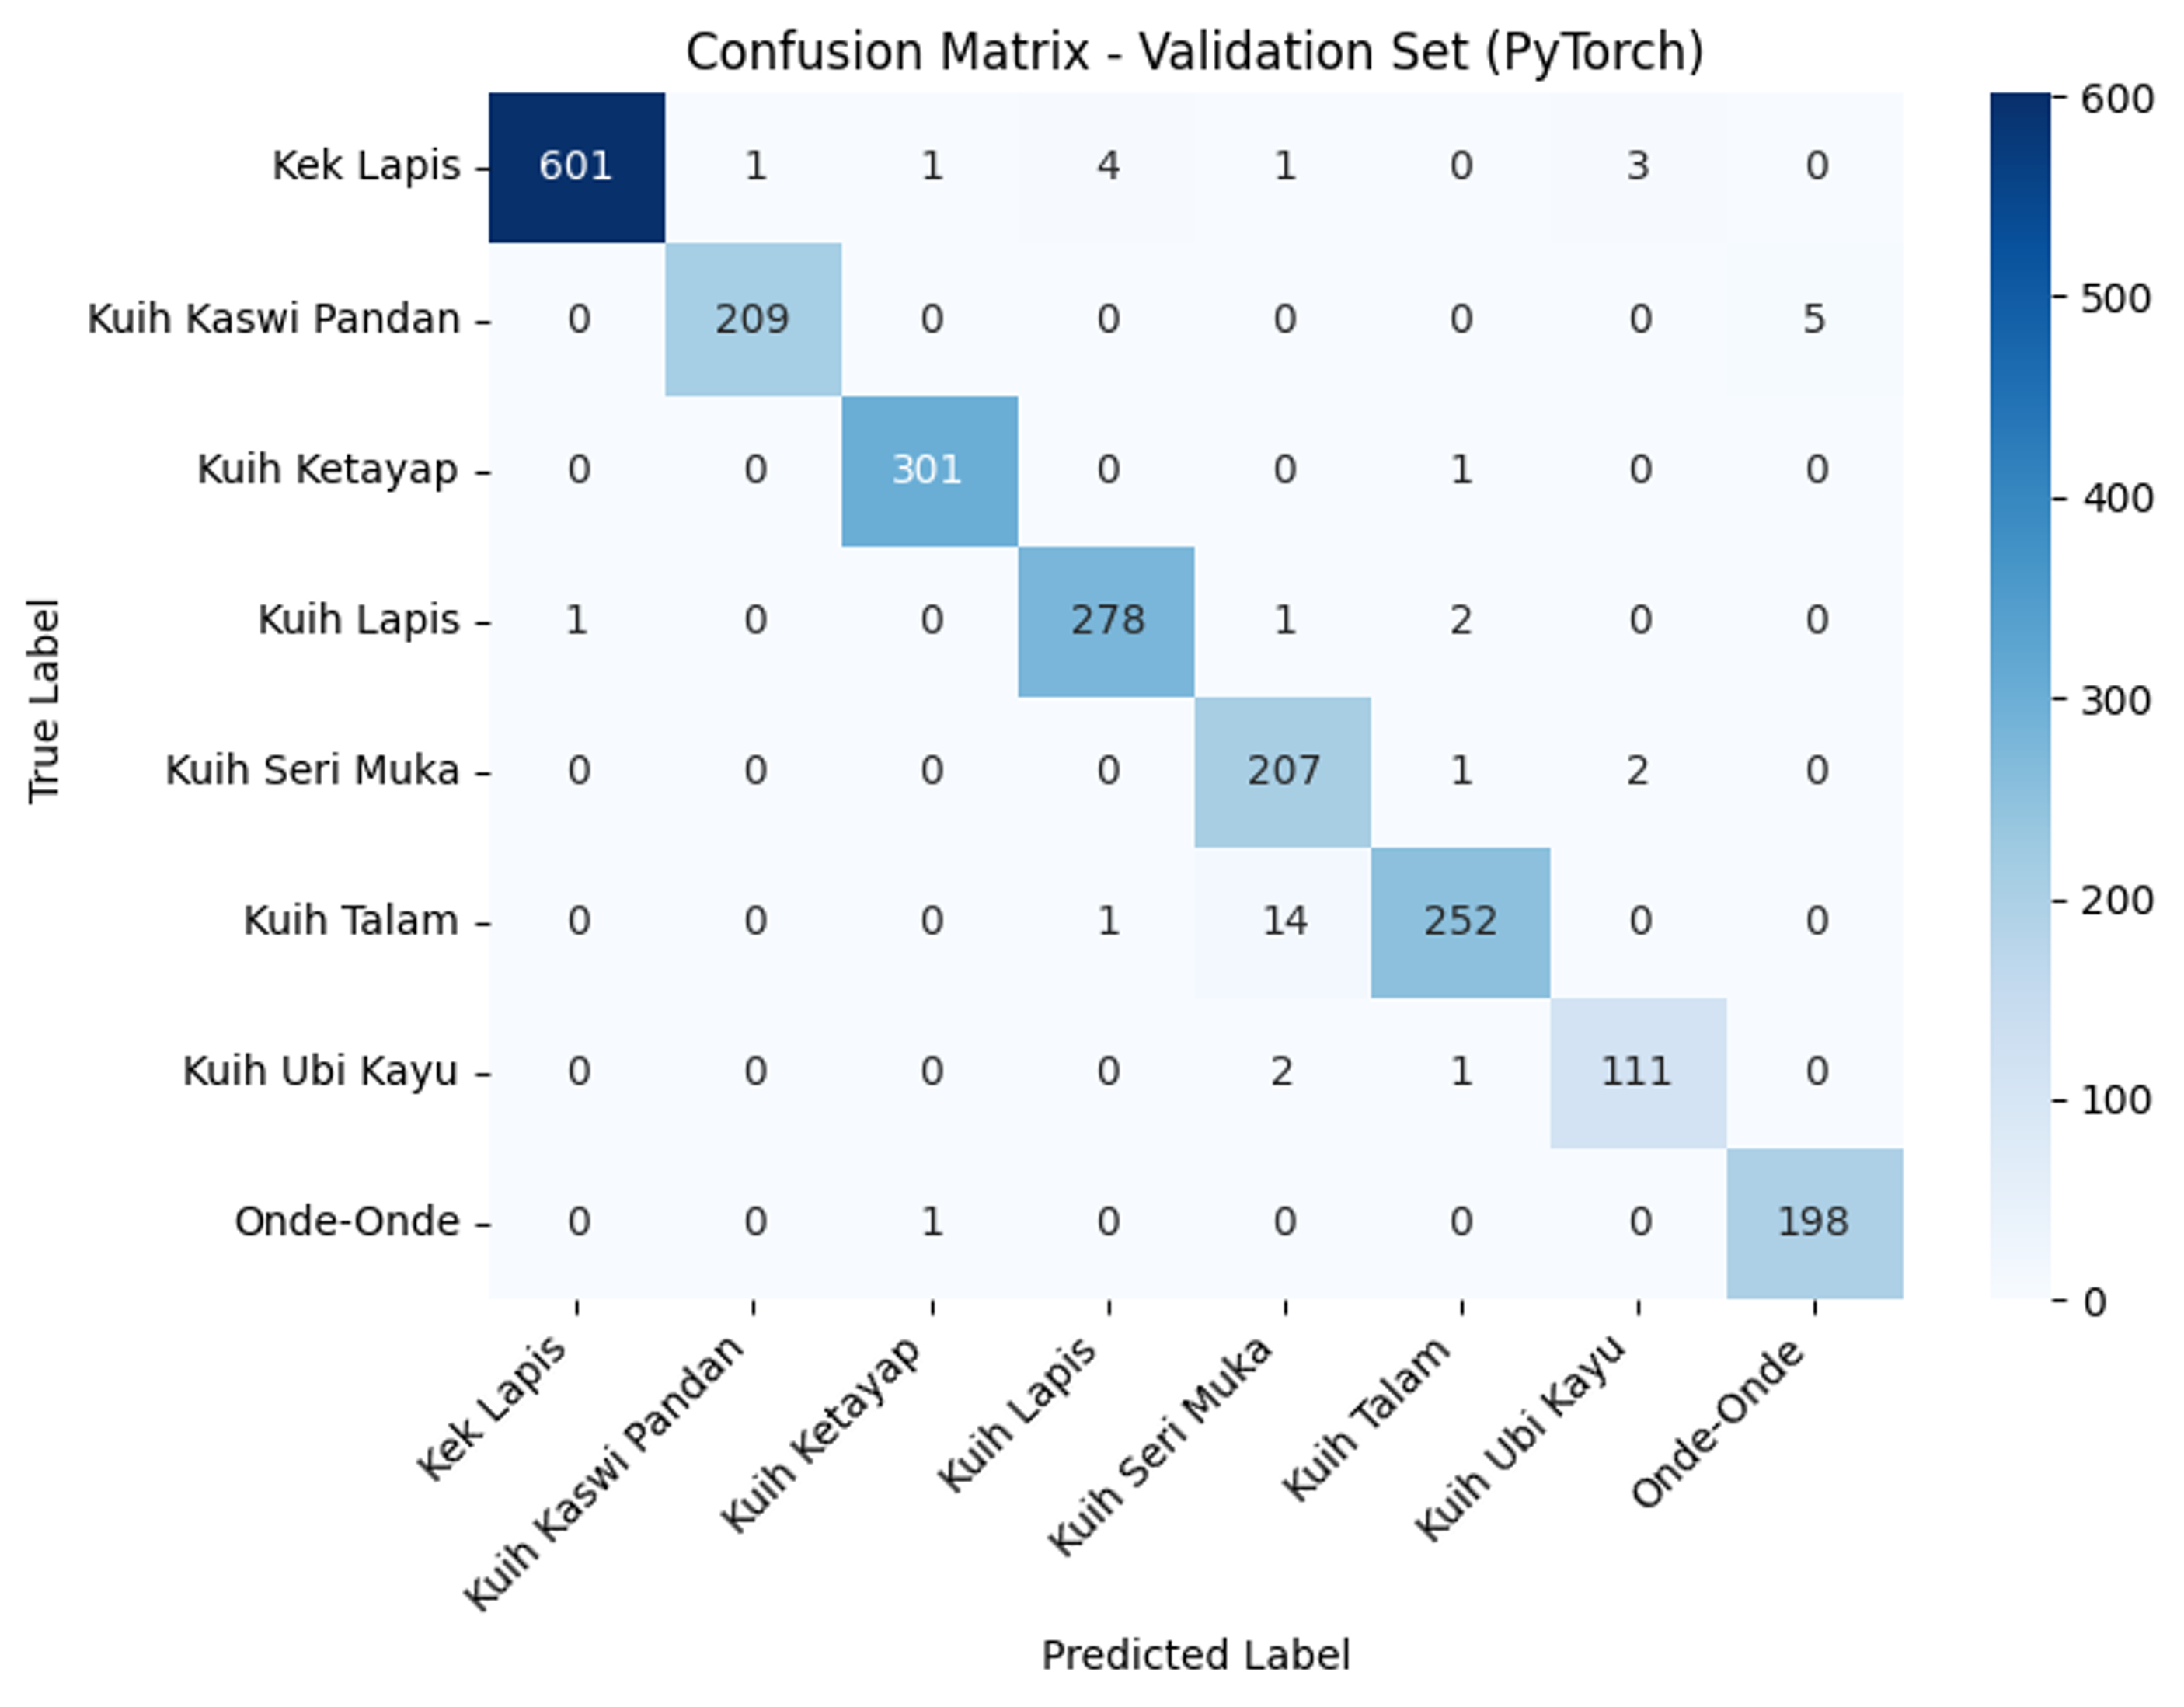
Evaluation and Results
We managed to achieve validation accuracy of 98% and test accuracy of 100%. The classification report and confusion matrix are shown below:
Conclusion and Future Work
We were extremely satisfied with the results of our model; huge shout out to my teammates who gathered this insane amount of data, helped with market research and brought us kuih at 6.30 a.m. for our presentation.
Market Value etc.
In the kuihs shop in Malaysia, we notice there is a lack of manpower in the kitchen, as there is a need for a lot of manpower handling the payments, as not all employees are proficient with kuih recognition. By talking to a few shop owners around KL and Penang, they expressed interest in this project as it helps automate the process of buying kuihs, allowing more workers to focus on producing high-quality kuihs.
GitHub Repository
The code for this project is available on GitHub. It includes the posters we used, the model, the API and the requirements. However, the training code is not provided. If you have any need for it, please contact me via email as it looks a little messy without cleaning up. I will be happy to share it with you.